Content
- Overview
- Adding a household
- Add plug
- Add appliance
- Add Programms
- Manual control of plugs
- Schedule Tasks
- Scheduling
Overview
To start or use the app, a connection to the Internet is required. Please make sure you are connected to a WiFi or activate mobile data with sufficient data volume before using it. It is not necessary to be logged into the same wifi as the plugs used.
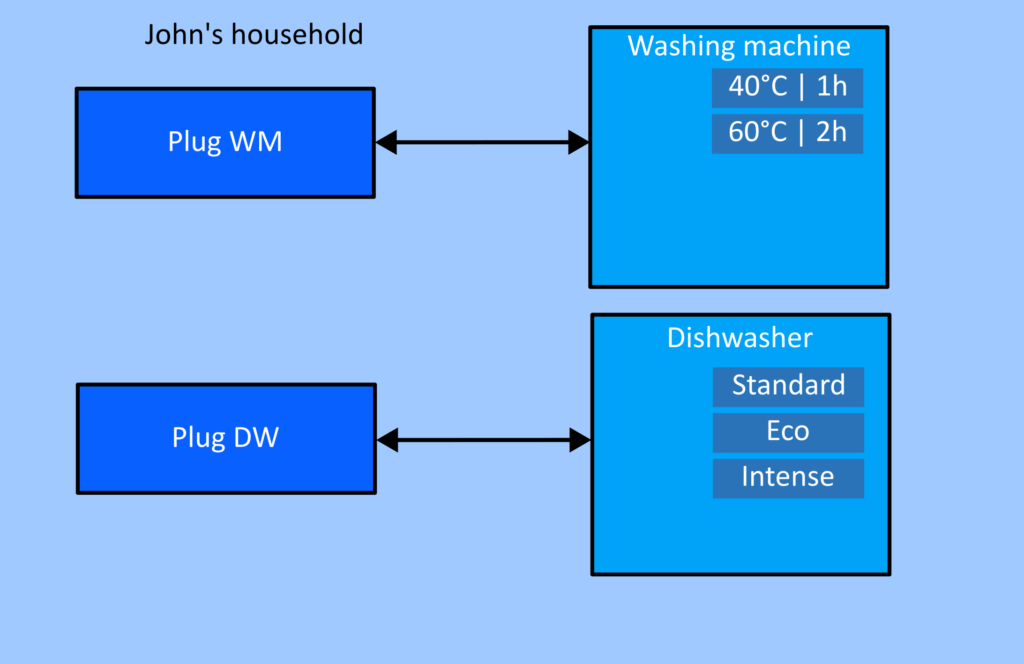
In order to use the app effectively, the key elements of the app are explained below. In a household, one appliance is controlled by one plug. For each appliance, several programs can be created, which specify, for instance, the duration and type of work performed.
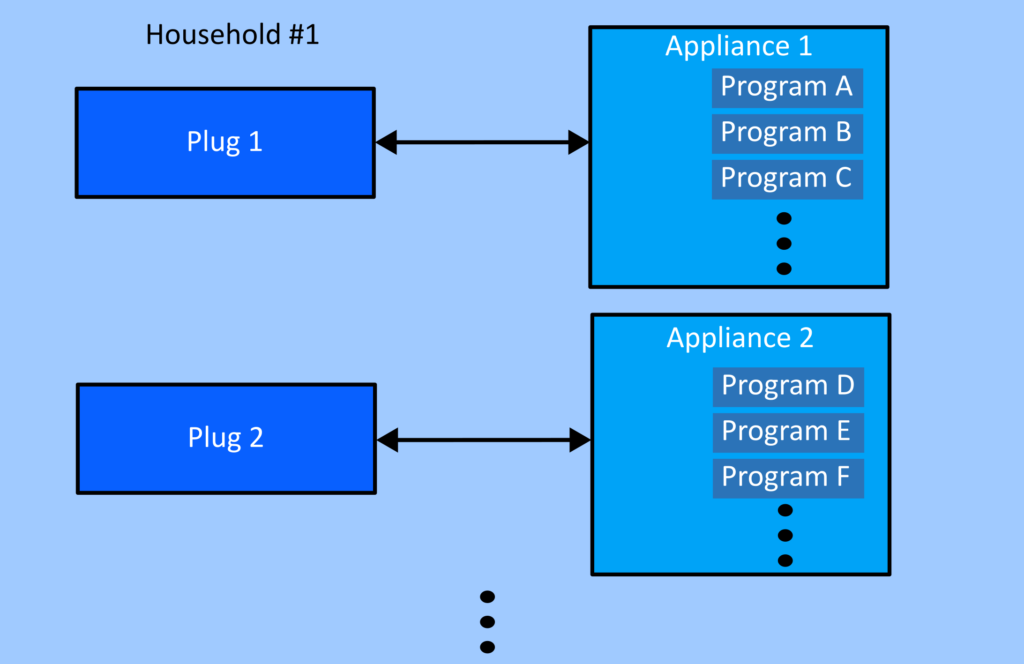
In the case of a washing machine, this would be the washing programs that can be set on the appliance. For example, for a specific household where two IntelliGrid plugs are used, it could look like this:
Adding a household
The first step is to create a household. The household later contains all the plugs used by you in the household, as well as appliances and their programs.
To create your household, execute the following steps:
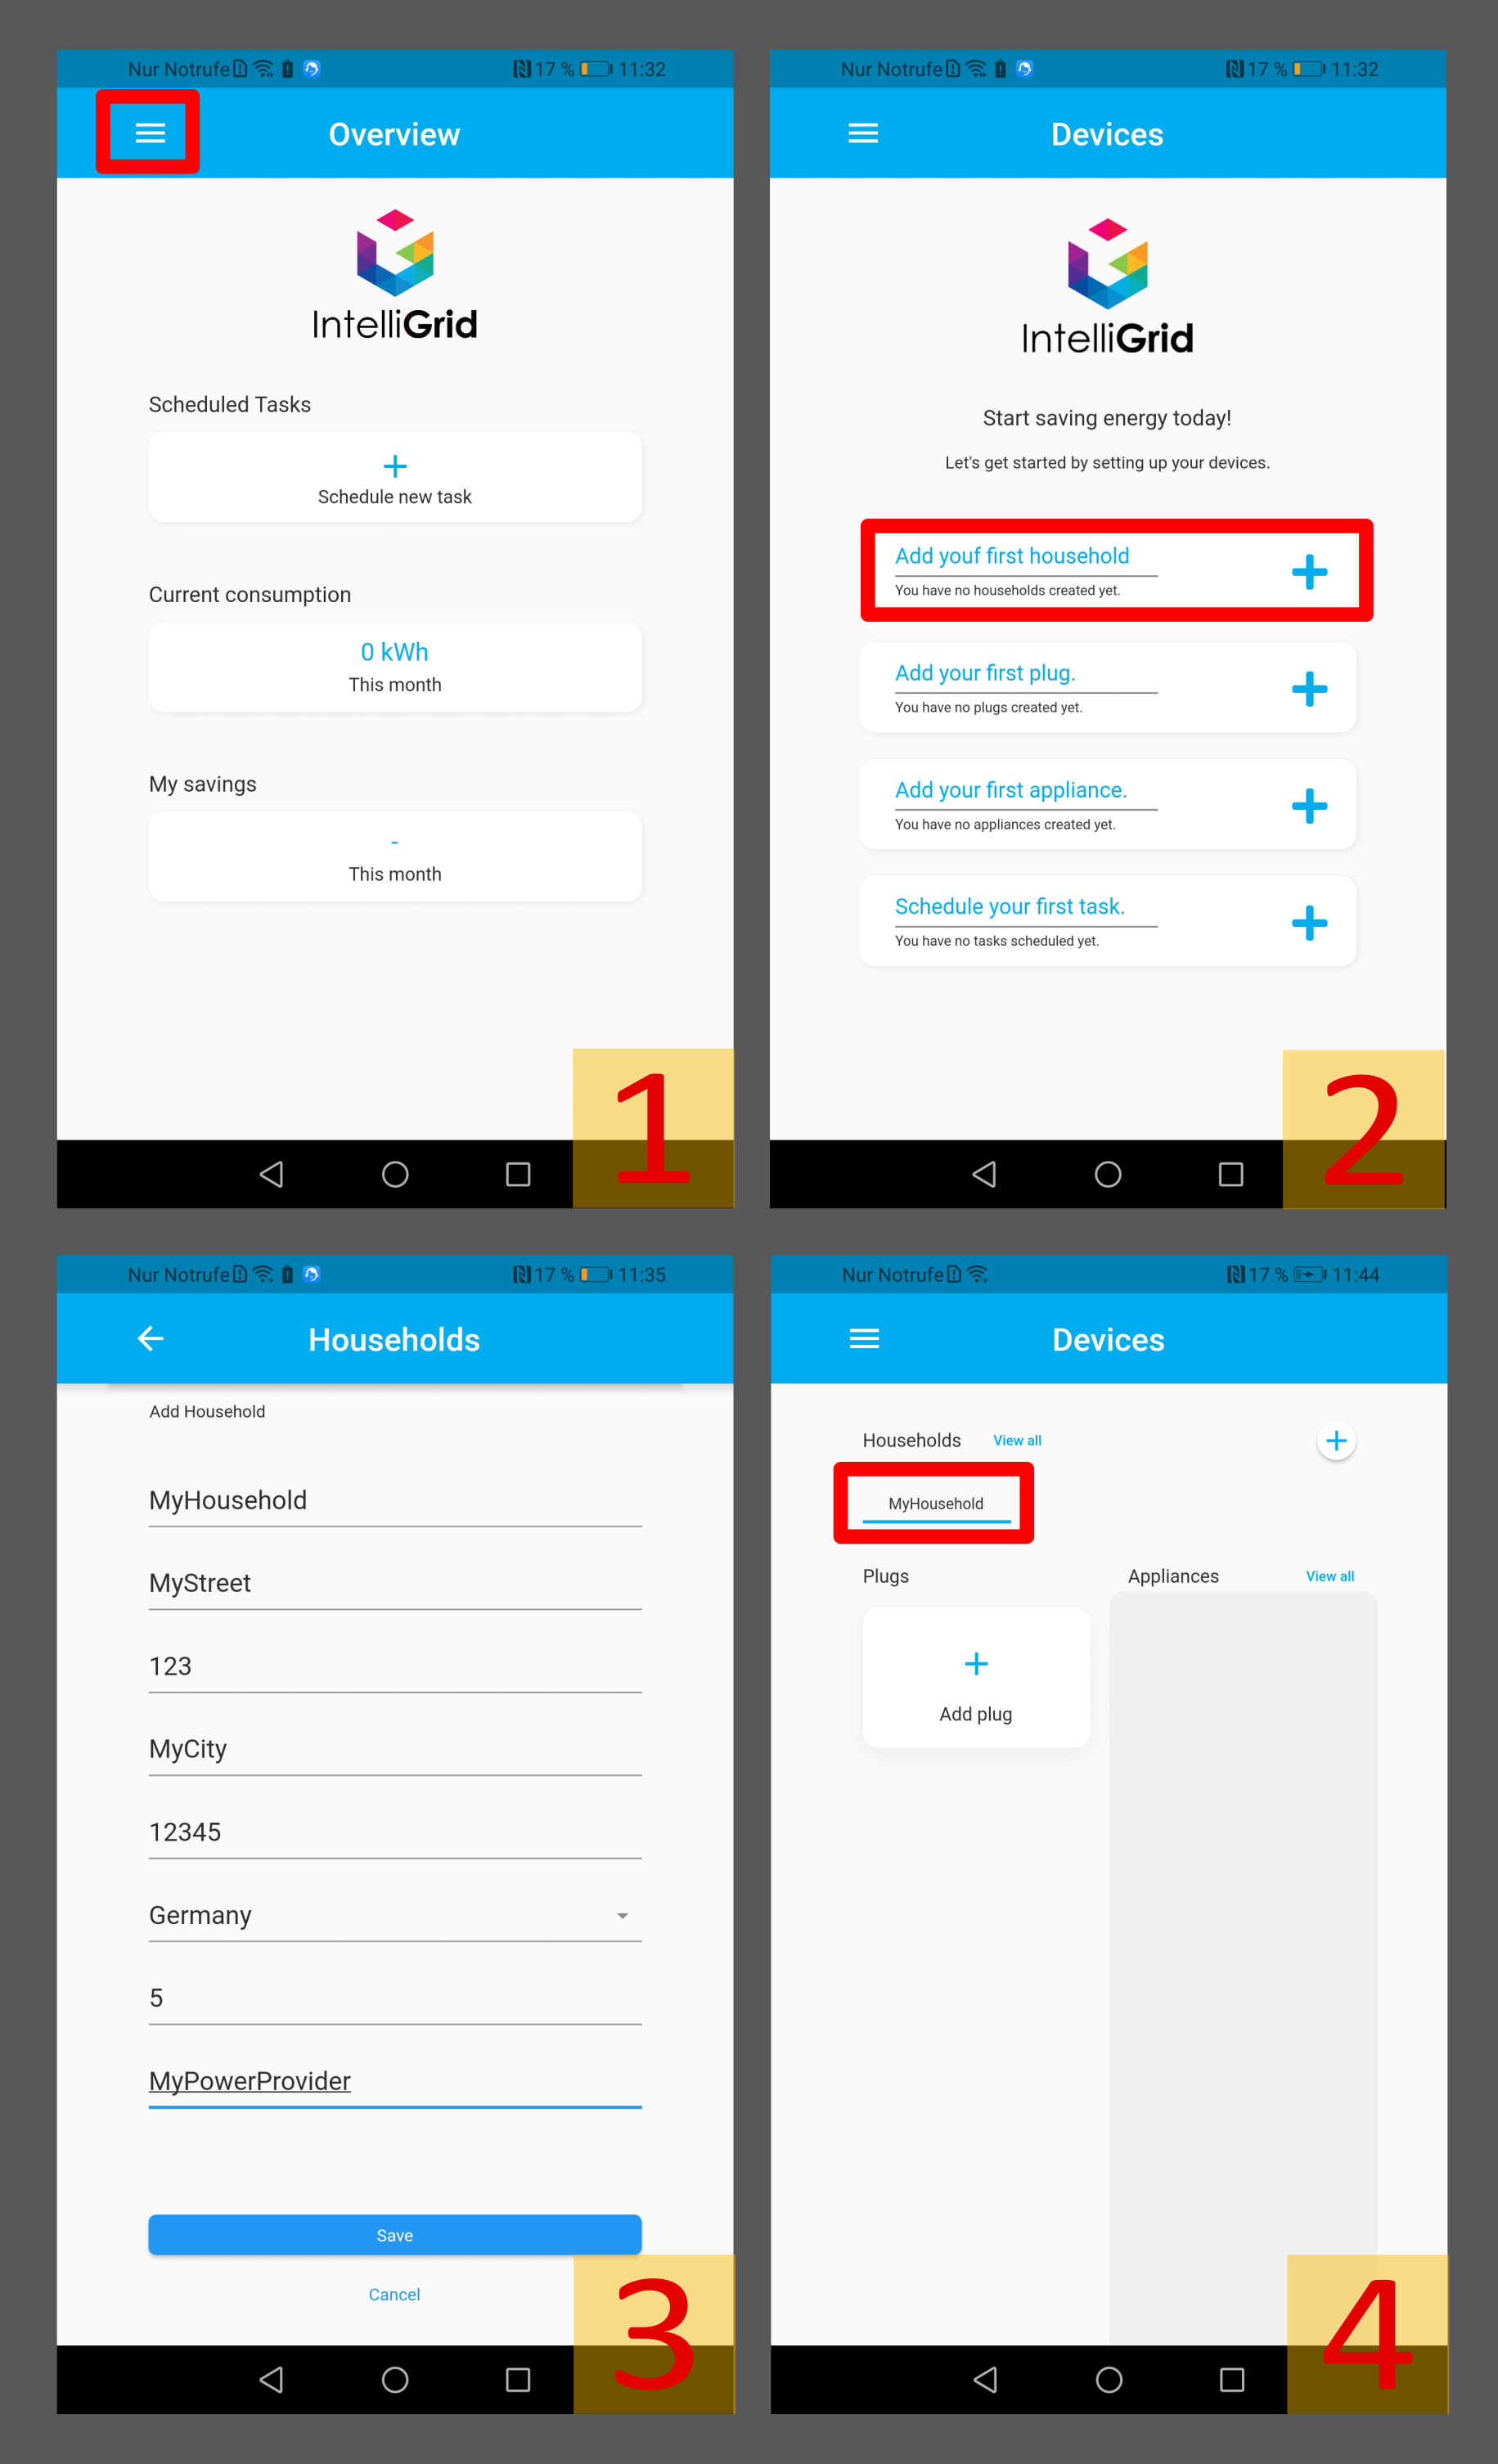
- Open the main menu
- Click on the “Devices” entry in the menu and on the following page on “Add yor first Household”
- Fill in the empty fields accordingly and click on “save”
- In the devices menu, the created household now appears in the upper area. If several households are created, they are displayed next to each other
- To add more households click on the plus icon to the right of the households
If you want to change the details of the household, you can do so by clicking on “view all” in the devices menue and the on the small pencil icon next to the name of the household.
Add plug
The process of adding a plug in the IntelliGrid App is described in a separate guide.
Once you have followed the steps in these guides you can proceed to the next step “Add appliance”.
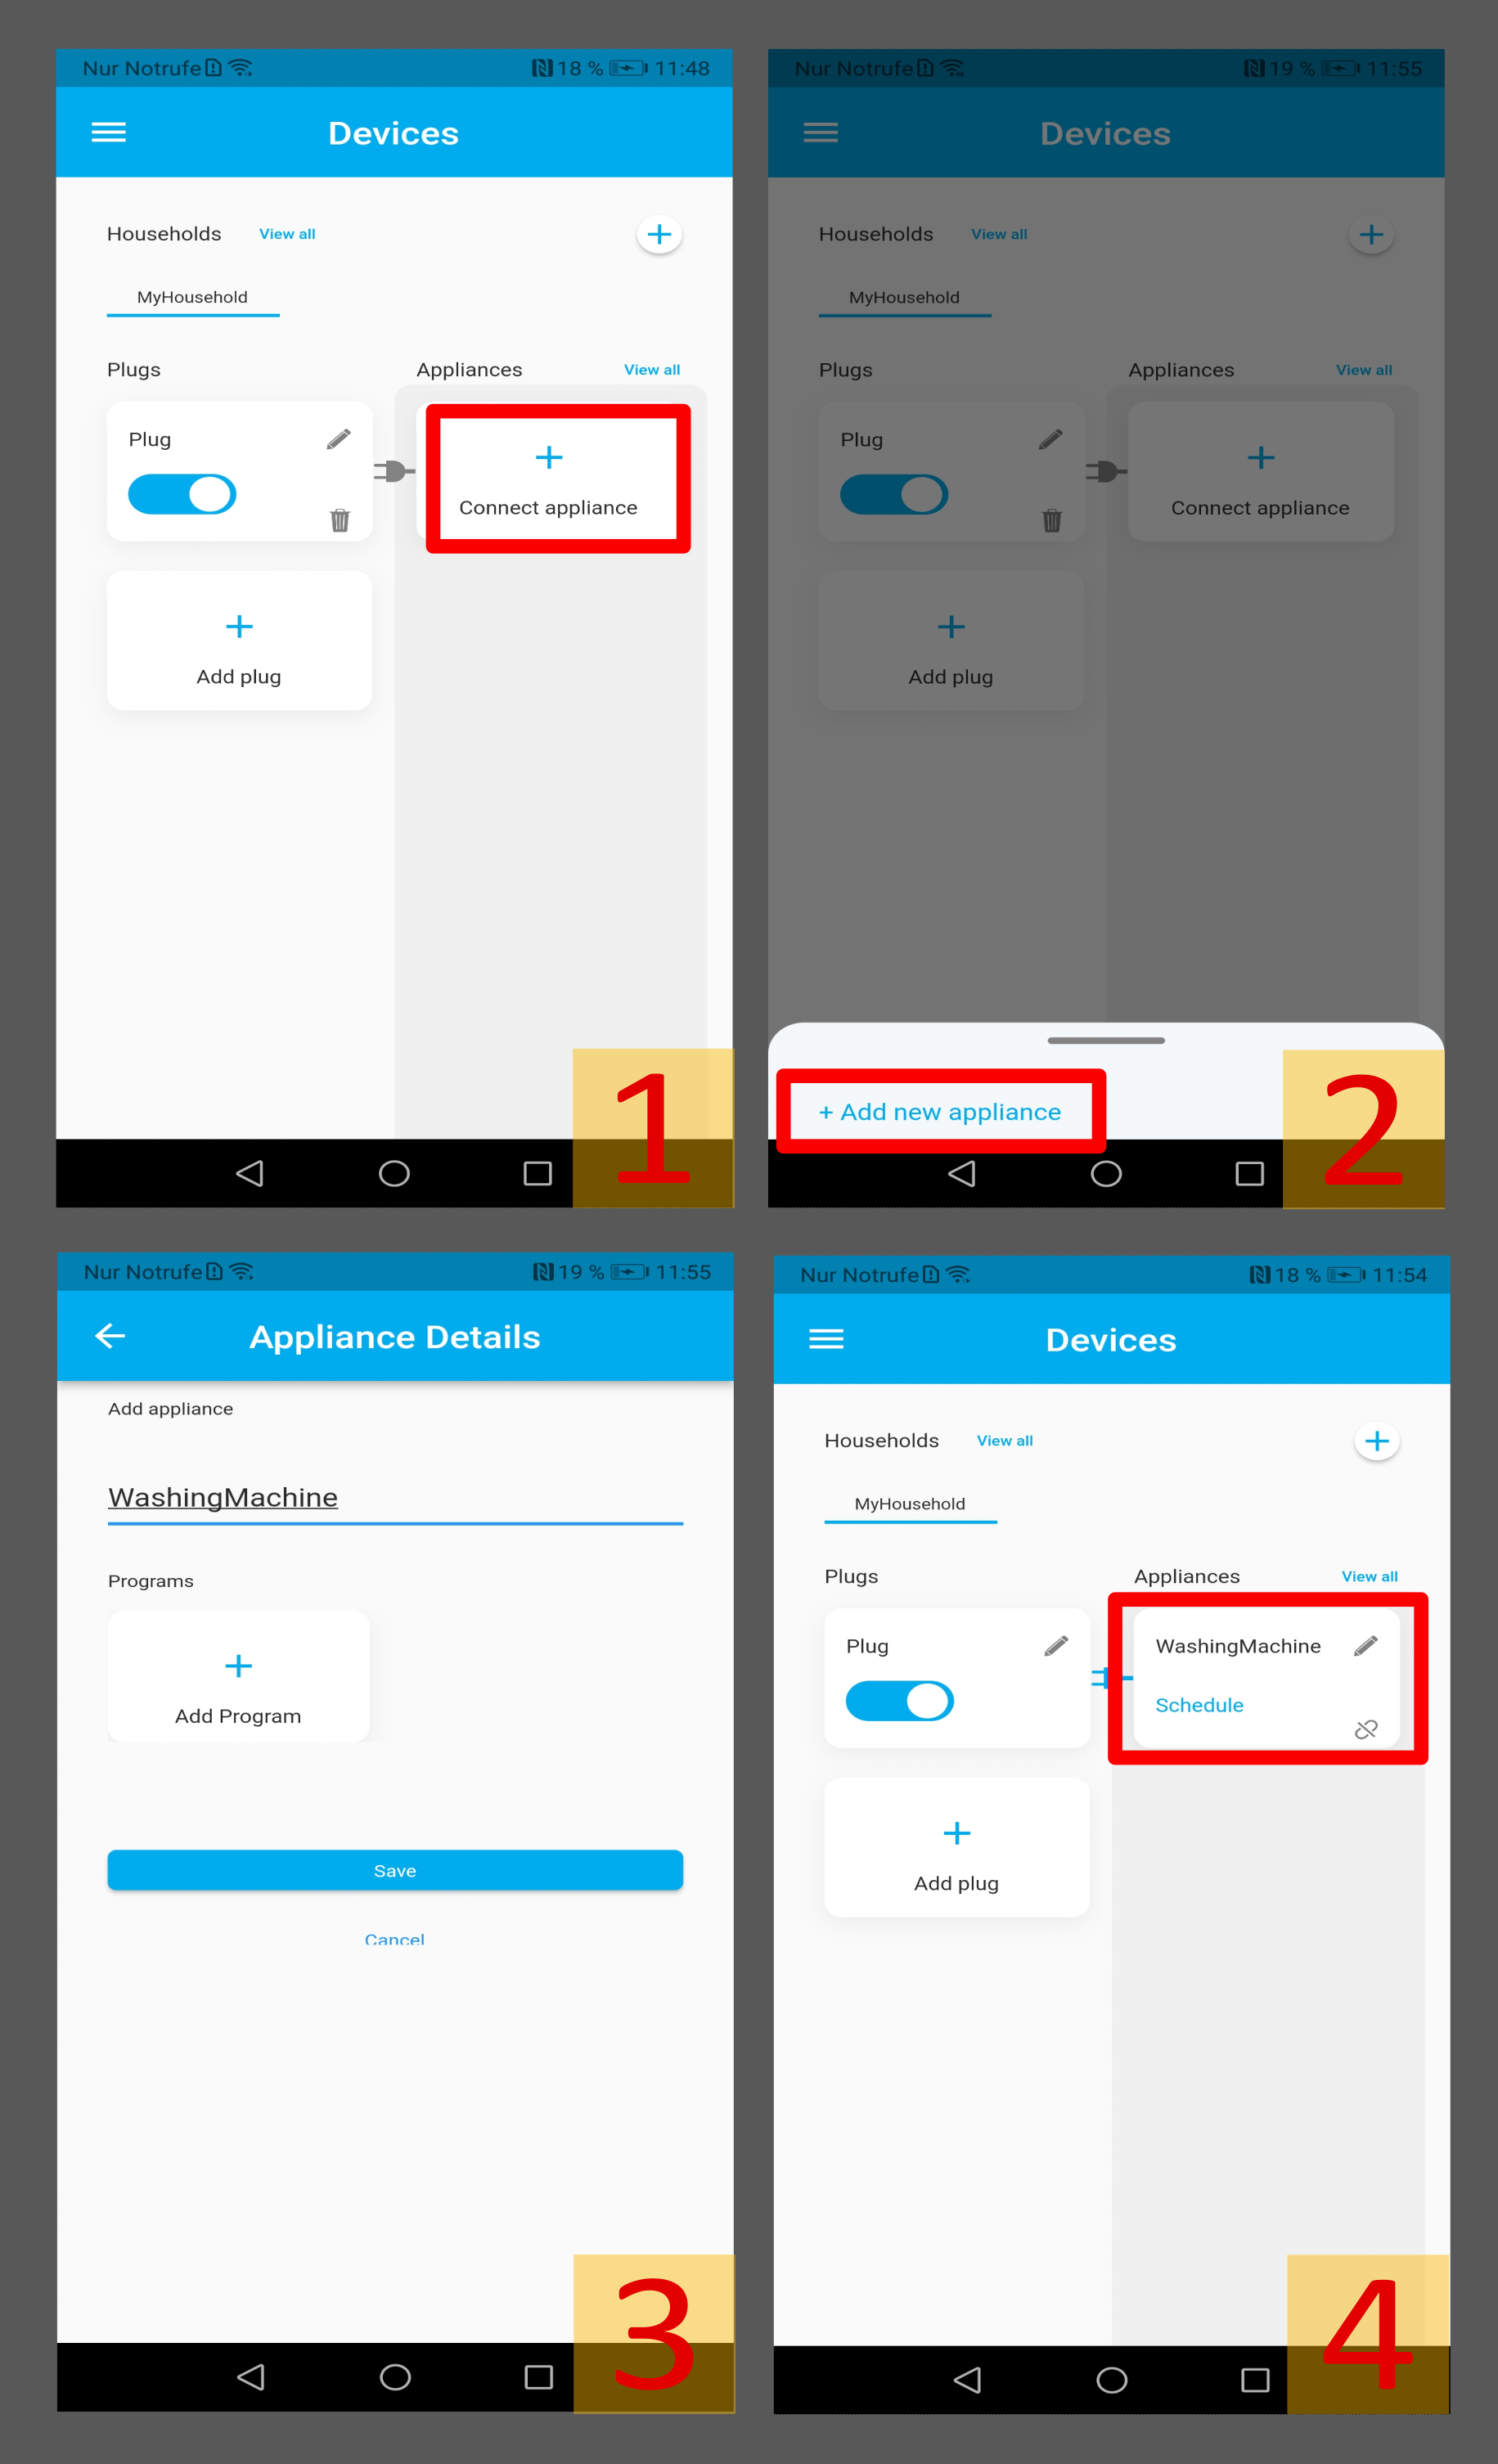
Add appliance
The appliance is an electrical device that is to be controlled via the IntelliGrid.
To add a new appliance please do the following:
- Click the “Connect appliance” button in the “Devices” window. Alternatively, you can first click on “View all” and then on “add new”.
- Click on “add new appliance” in the window that appears at the bottom of the screen.
- Assign a unique name that describes the appliance well and click “save” (Optionally, you can also add programs for the appliance at this point. Please refer to the “Add programs” section). You should now be able to see the appliance you just created at the bottom of the screen. Click on it to select it.
- The appliance is now assigned to the corresponding IntelliGrid plug. You can see this because of the blue connector symbol which connects the two fields.
The appliance is now created. If you have not yet assigned any programs to it, you can do so in the next section.
Add Programms
A program contains the duration that the device needs to perform its work.
The following steps are necessary to create a program:
- Click on the small icon with the pen in the “Devices” window. Alternatively, you can also click on “View all” to the right of appliances and click on the pencil symbol of the corresponding appliance in the window that appears.
- Click on “Add program”
- Give a meaningful name to the program. In this case we will create a program for the washing machine. It is a 40°C program in Eco mode with a duration of 75 minutes.
Select the approximate duration of the program with the up/down arrows and click on “save”. - The created program now appears with its name for the corresponding device. Click on “save” to complete the process.
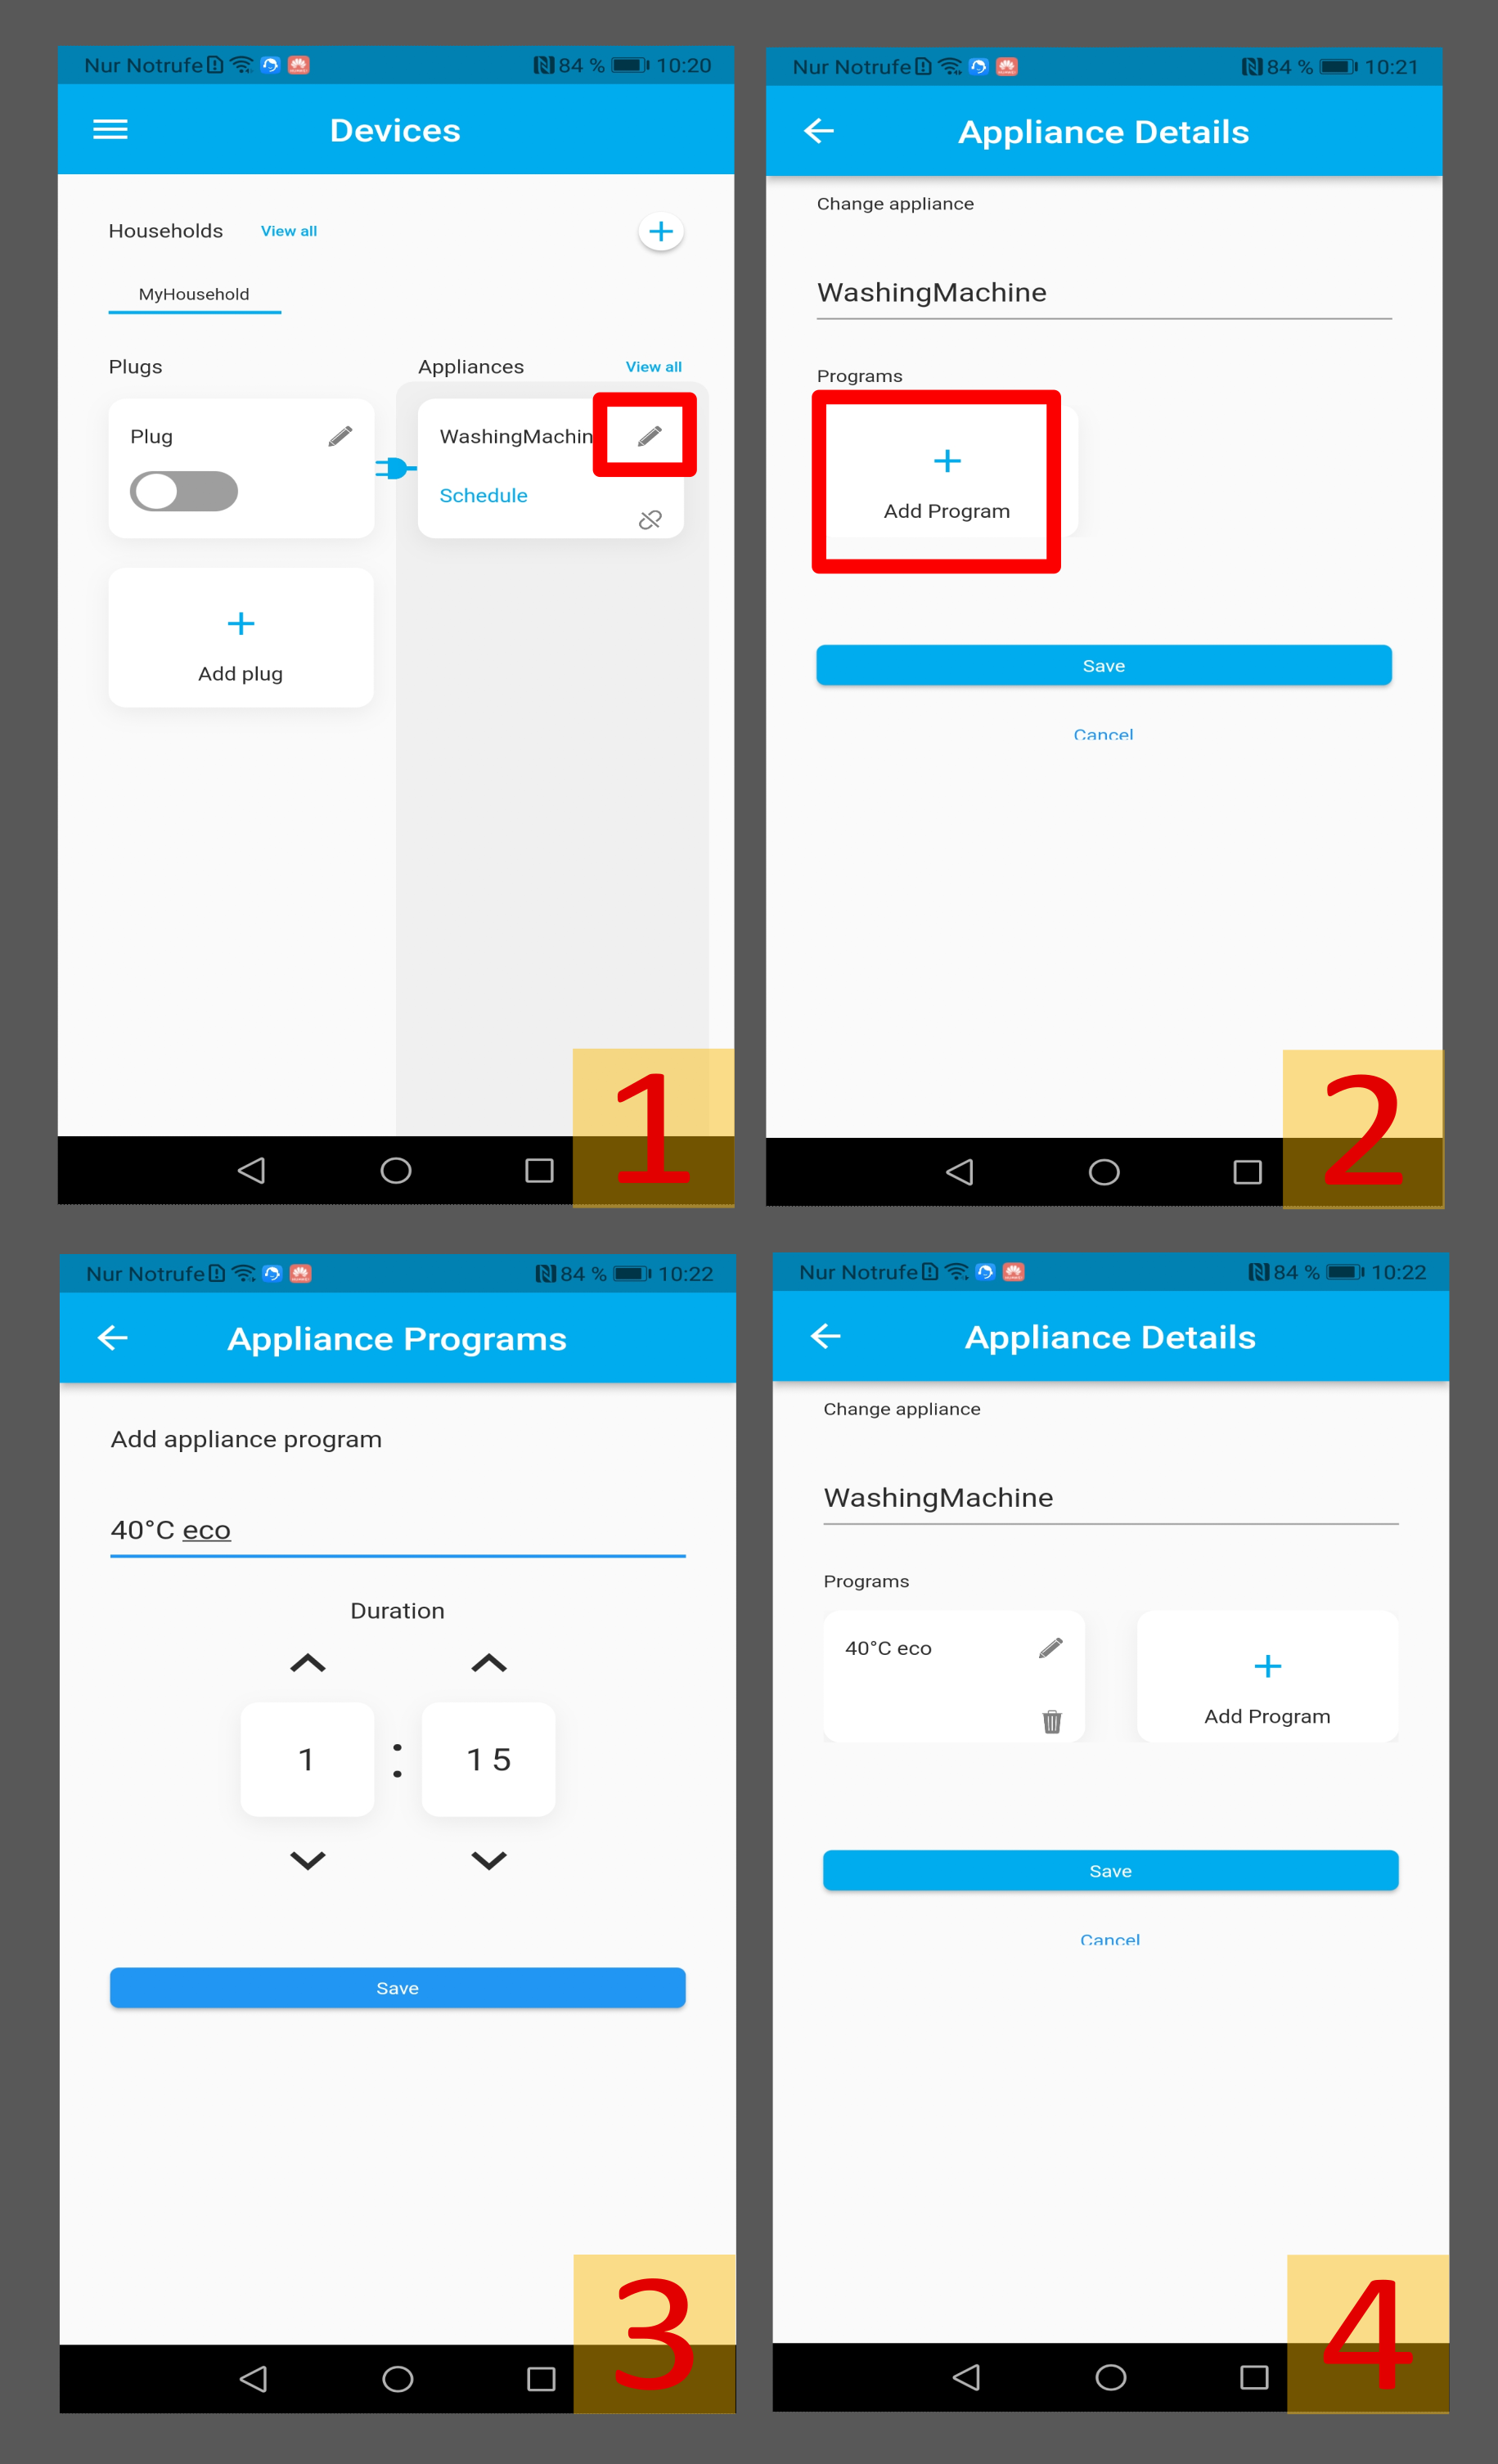
In this way it is also possible to create several programs for one device. For example, for our washing machine we could add the programs “30°C quick wash” with a duration of 30 minutes and “60°C colored wash” with a duration of 120 minutes.
A program is only applicable to the device for which it was created. For example, if you want to control two washing machines (two appliances) via two plugs, the program must be created separately for each appliance.
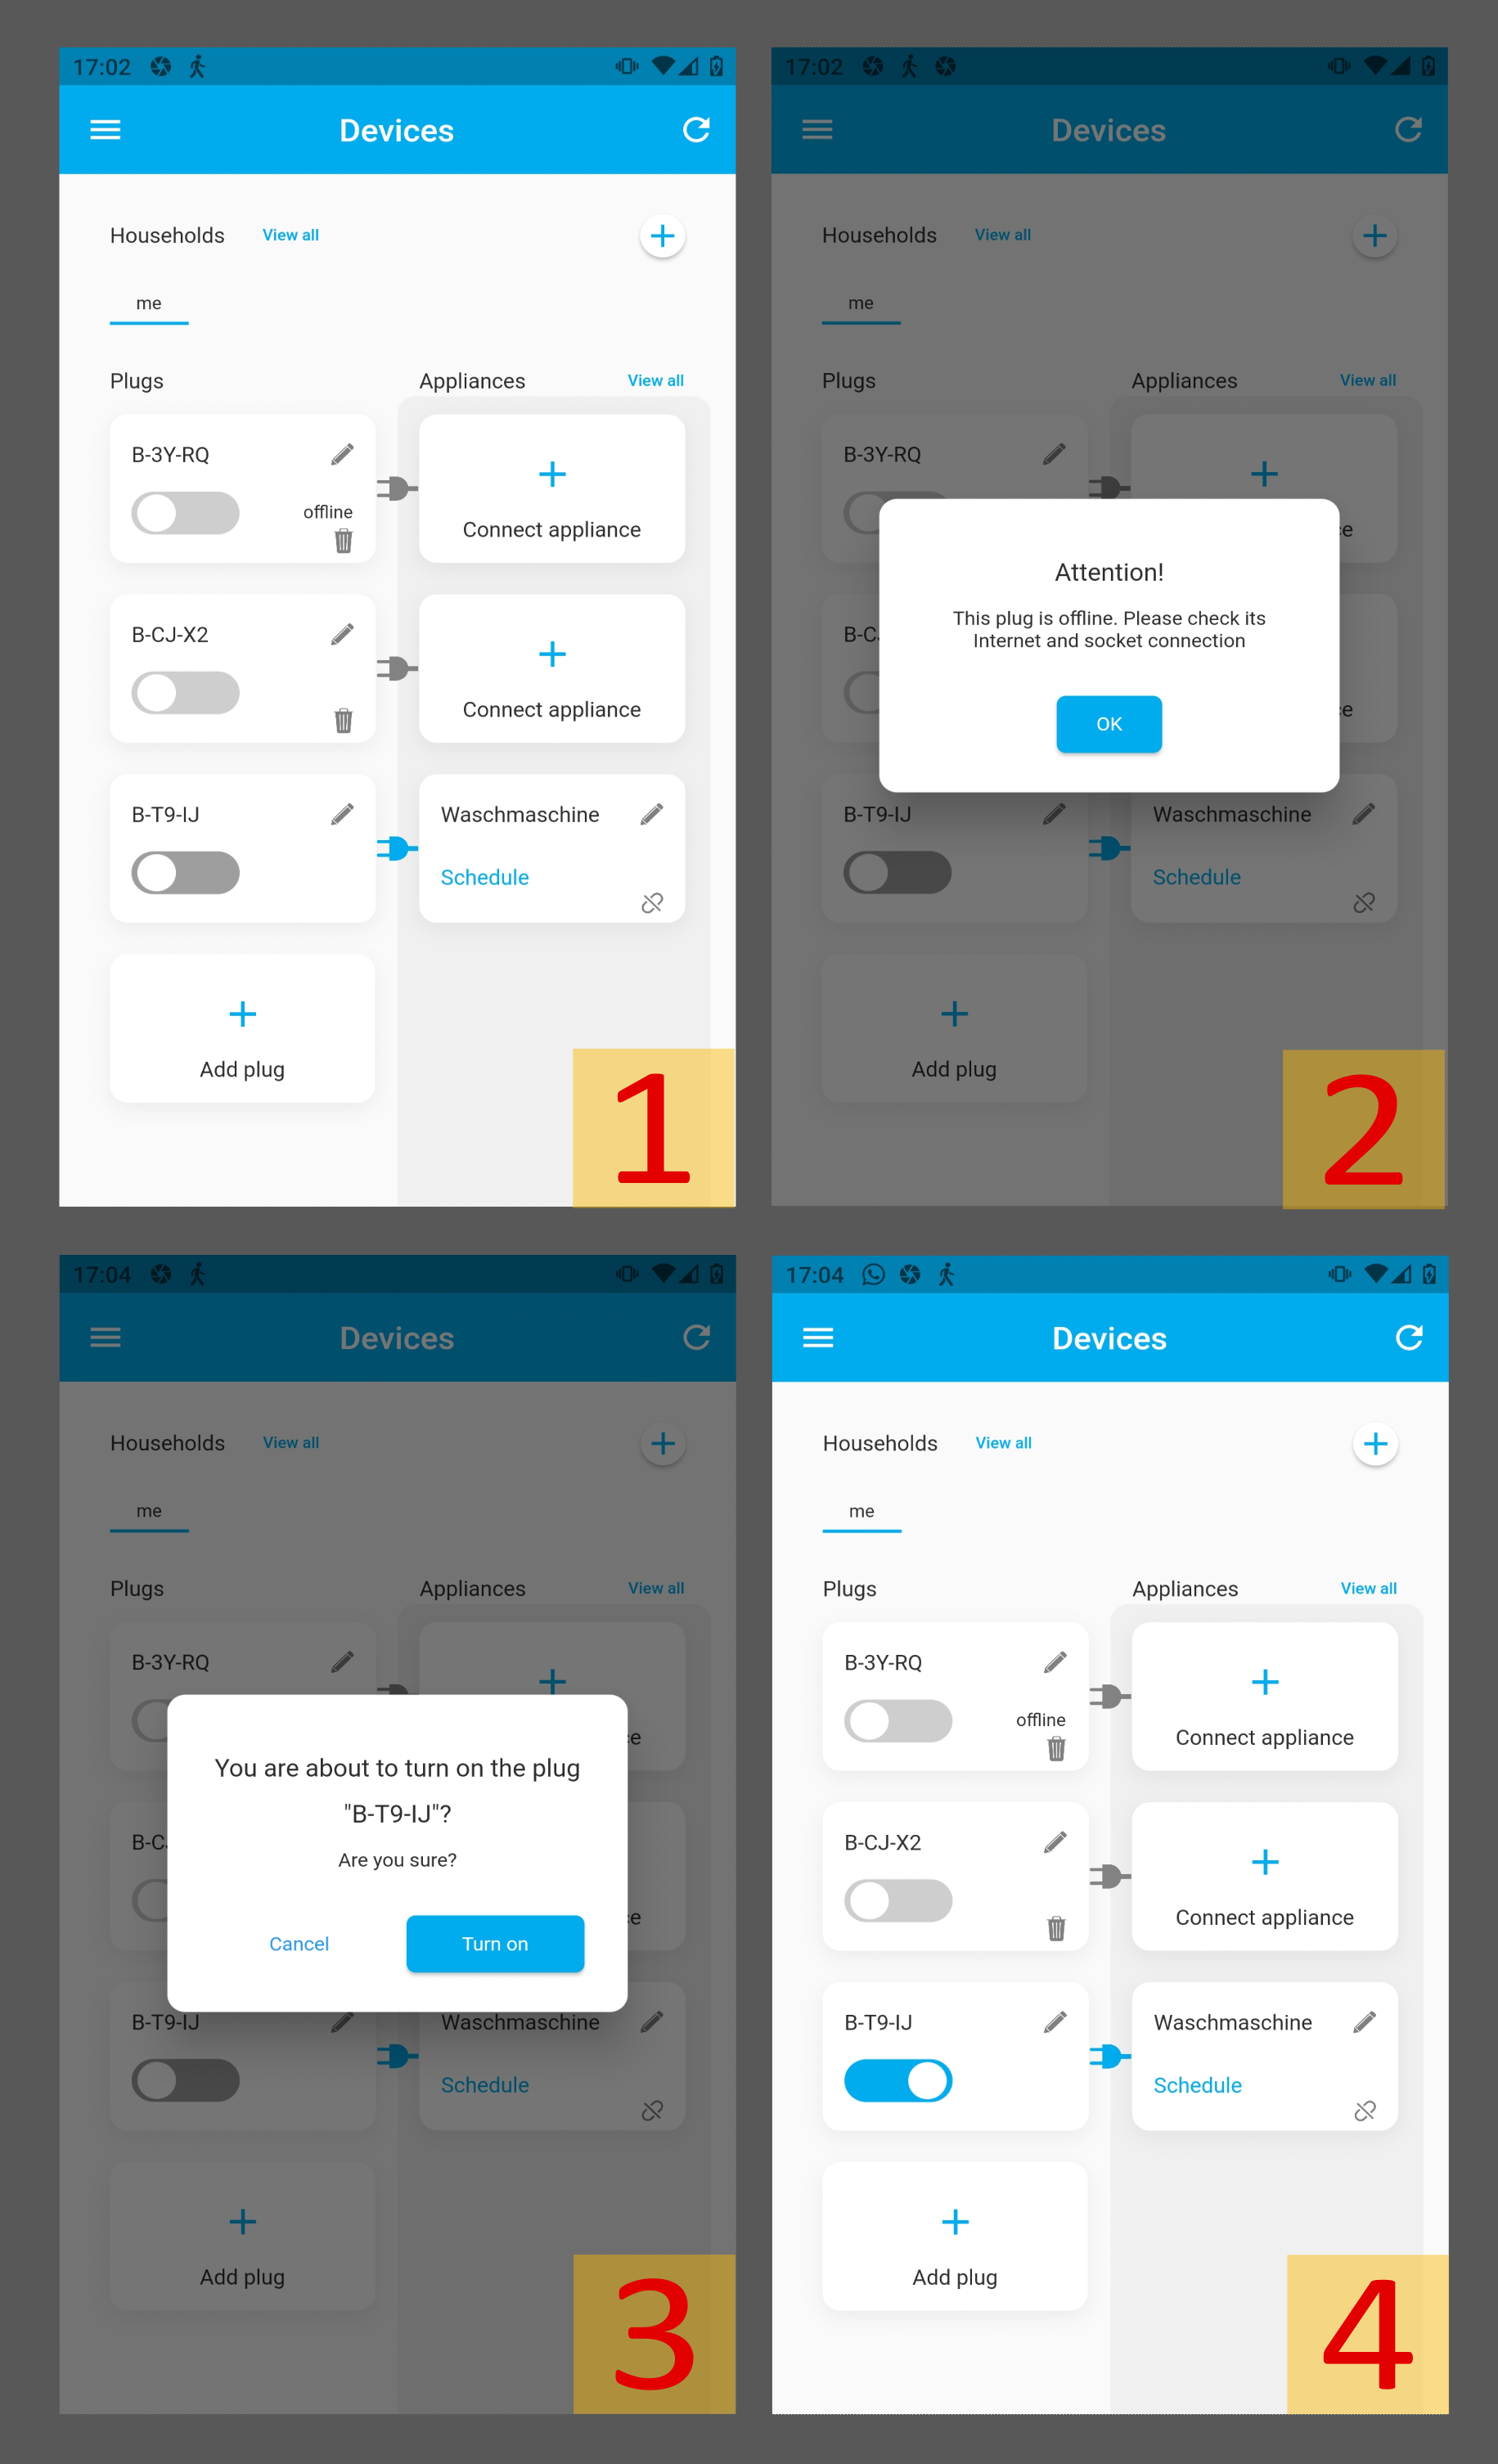
Manual control of plugs
In addition to being switched on and off automatically by the IntelliGrid, our plugs can also be controlled directly via the app.
In the device menu, there is a small slider under the name of each plug. With a click on the slider, the plug can be switched manually. For this, however, the plug must be plugged into the socket and an appliance must be assigned to it. As soon as a plug can be switched manually, the background color of the slider changes from light gray to dark gray.
Figure 1 shows three plugs as an example. The uppermost plug is not plugged into the socket and is therefore marked with the addition “offline”. If you try to switch the plug anyway, a pop-up window appears with the corresponding warning (Fig. 2).
The middle plug is plugged in, but not yet connected to an appliance. If you click on the slider, a pop-up window will indicate this.
The bottom plug is both plugged in and connected to an appliance. When the slider is clicked, a pop-up asks whether the plug should really be switched to prevent accidental switching ( Fig. 3). After confirming with a click on “Turn on”, the plug is switched and the slider changes its color to blue ( Fig. 4).
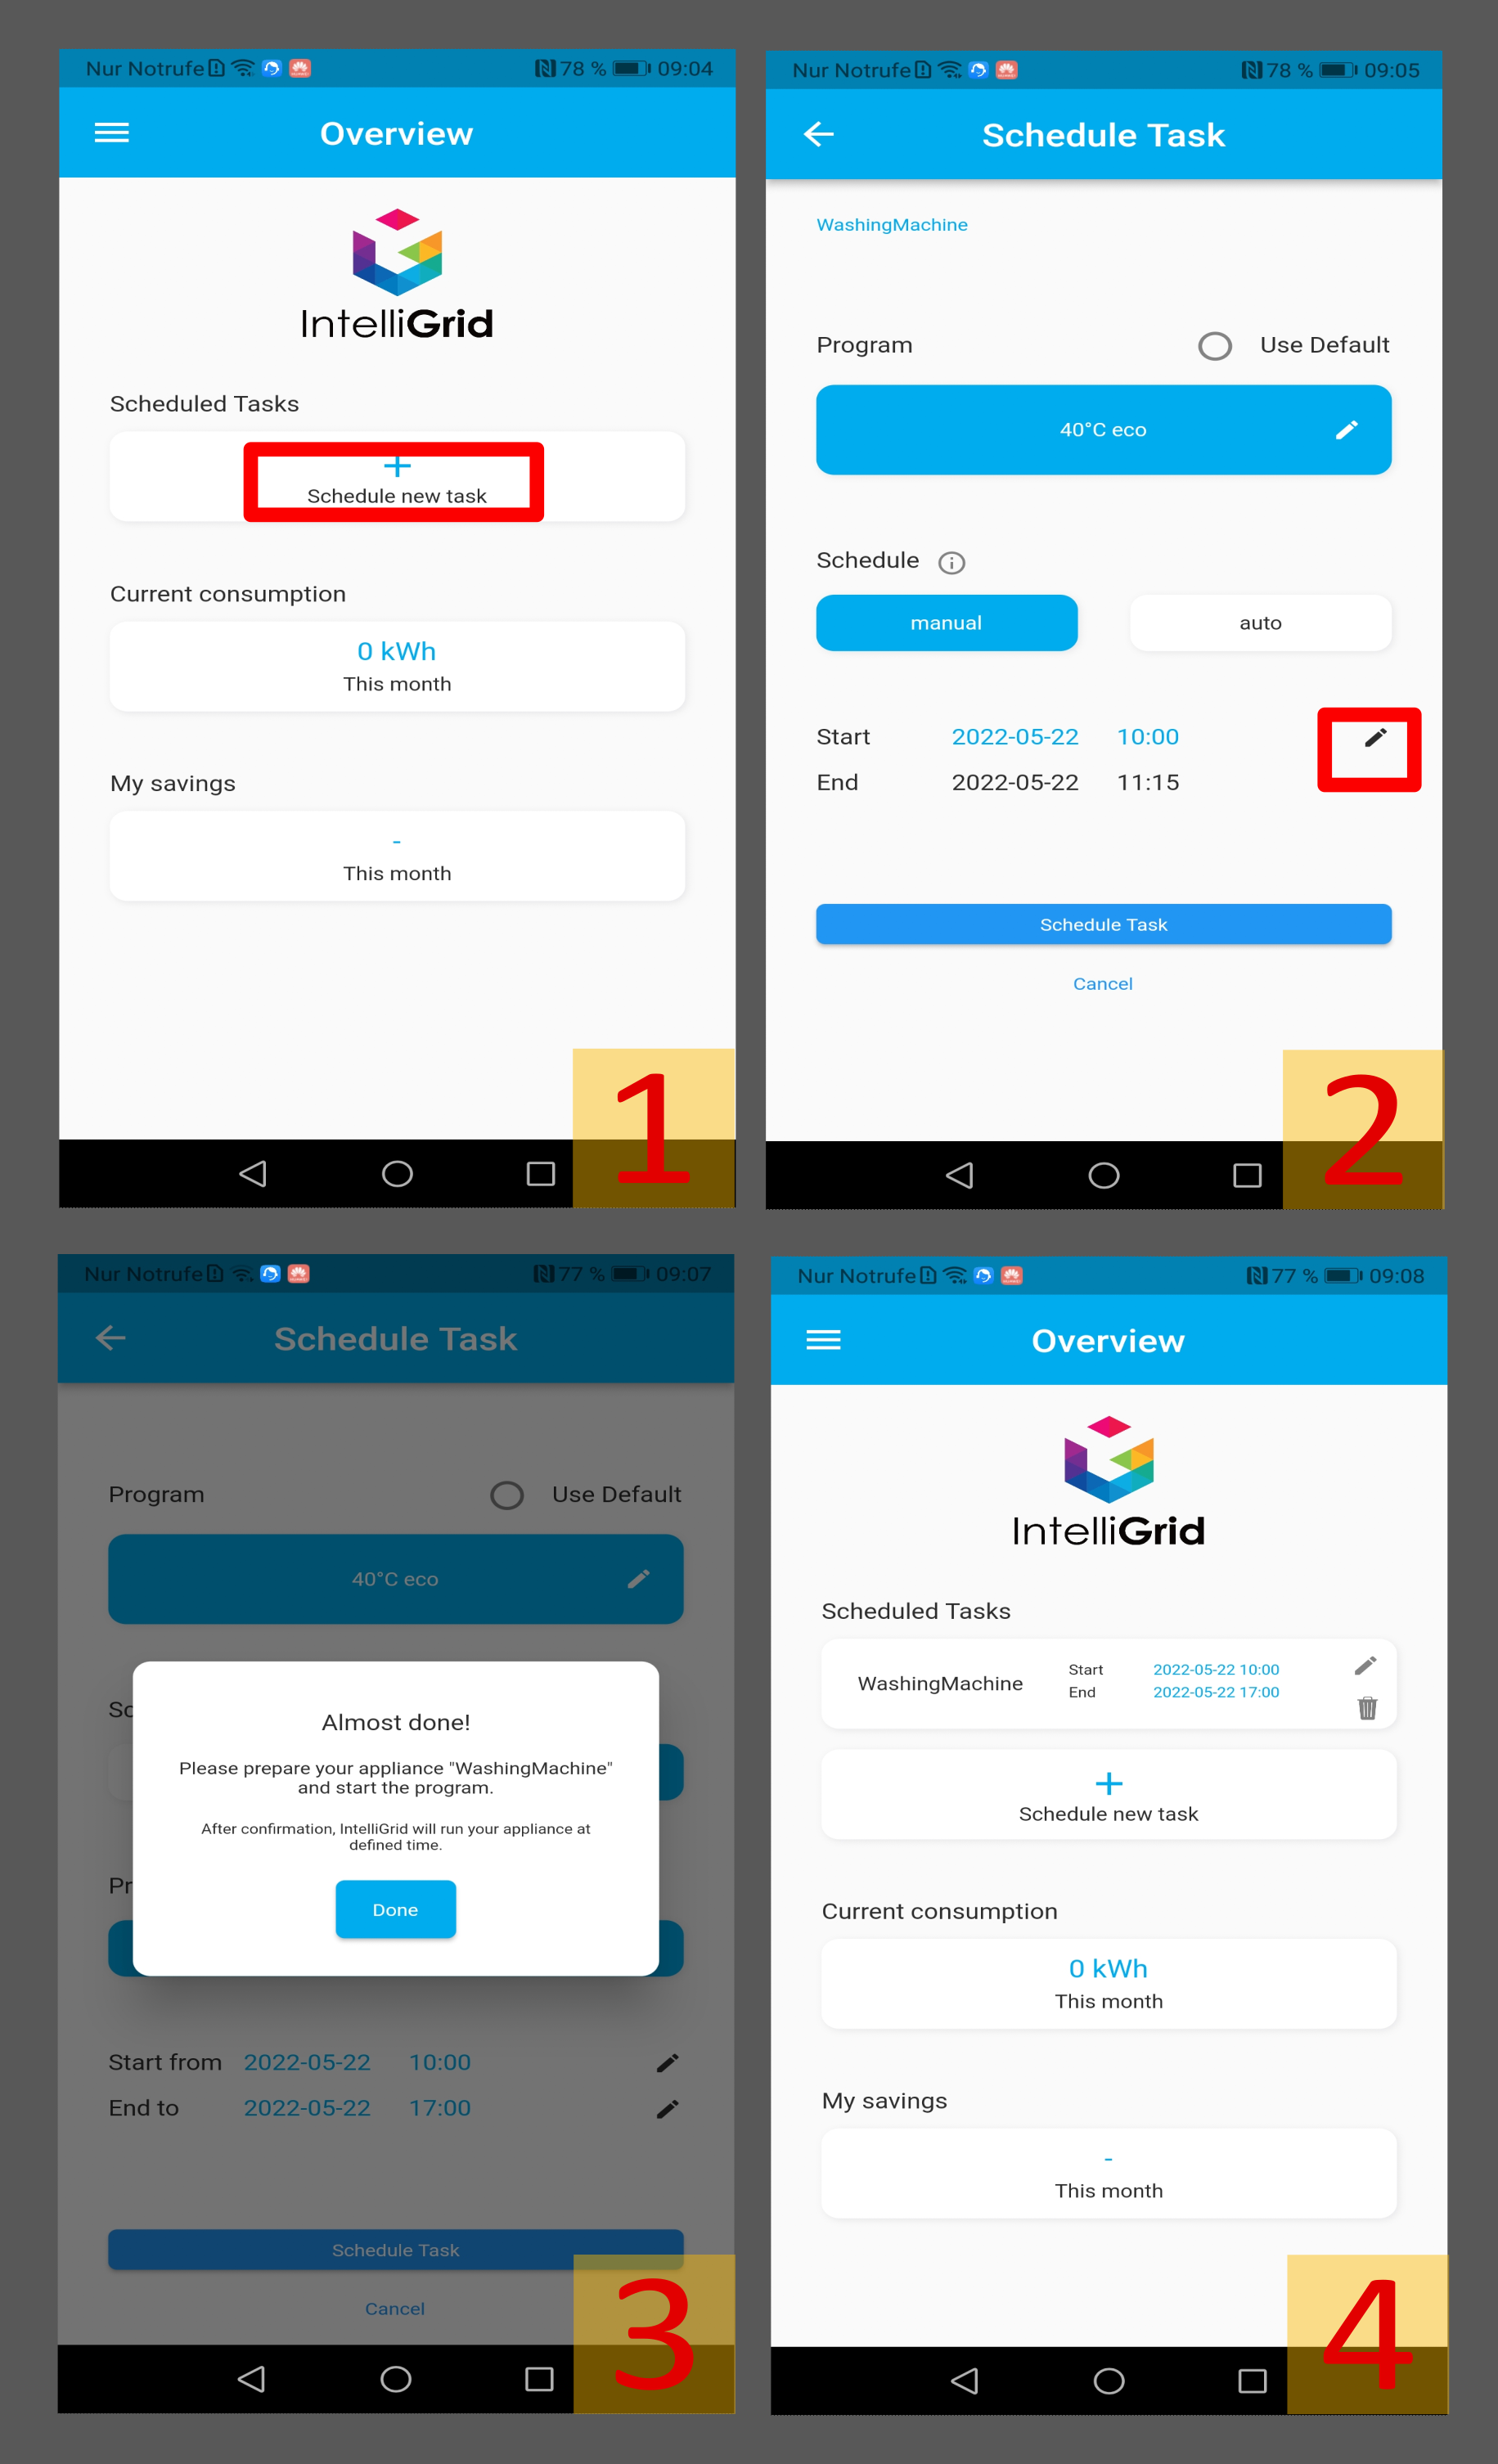
Schedule Tasks
A task is a action that is to be performed at a scheduled time or within a specified period of time. Before you start the “schedule task” process, you should manually set the corresponding plug to “on” to be able to prepare the appliance accordingly in step three. To create a task you have to proceed as follows:
- On the overview page, click on the “Schedule new task” button. Alternatively, click on “Schedule” in the “Devices” window for the corresponding appliance.
- First select the correct program by clicking on “Choose Program”. In this example, we select the program “40°C eco” for our washing machine. Once the program is selected, you have the possibility to choose the type of task execution with “maual” and “auto” (For more information on how both modes work, please check the next section Scheduling). Use the two small pen icons to select the start time or, in the case of “auto”, the latest time at which the task shall be completed. Then click on the “Schedule Task” button. In order not to have to enter all settings again each time, you can also activate the “Use default” option in the upper area. The first program of the appliance is then automatically selected, the scheduling mode is set to “auto” and the time window is preset with the usual values. This simplifies and reduces the process, since in most cases only the time window needs to be adjusted.
- Now two pop-up windows will appear one after the other. In the first one, you will be requested to turn on the appliance and start the program to be executed. Once this is done, confirm the message by clicking on “done”. The plug is automatically switched off within a minute and switched on again at the appropriate time so that the appliance then continues working. The second pop-up window is once again the confirmation for the user that the task has been scheduled correctly.
- The task is now created and is visible in the overview window. If you have selected “auto” for the scheduling mode, the time determined by IntelliGrid as optimal is displayed in the task instead of the selected time window. This may take a moment.
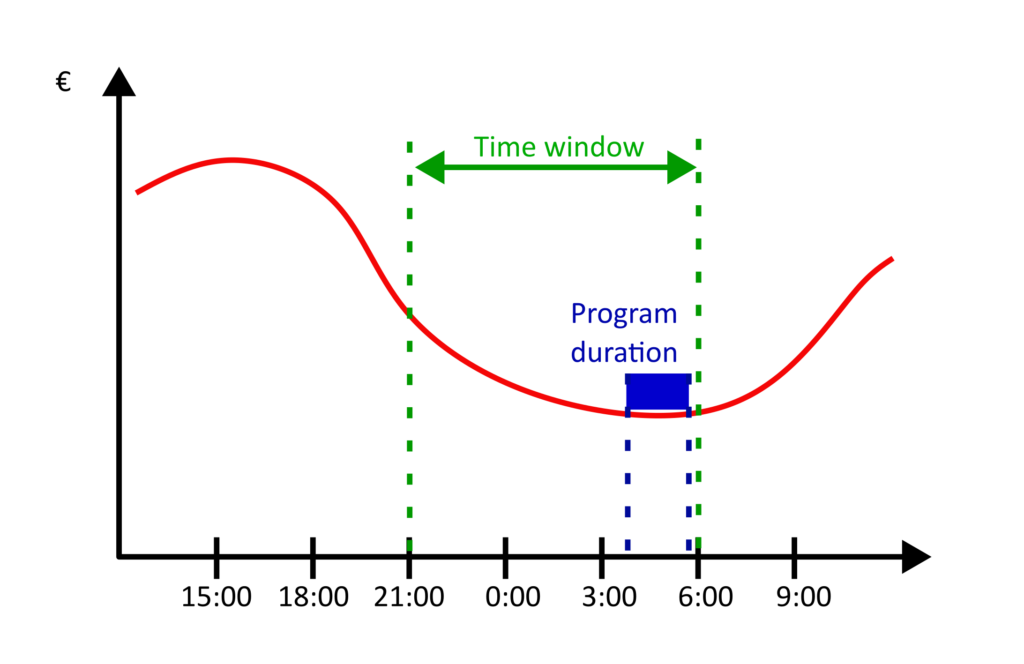
Scheduling
Manual: “Manual” means that the machine will be switched on exactly at the specified time.
Auto: With the “auto” configuration, a time window is specified in which the earliest start time and the latest end time are defined. This option uses prediction of electricity prices to schedule the task in the specified period for them as favorable as possible.
For example: Lisa wants her dishes done by morning. Since she usually has dinner at 8:00 p.m., the wash cycle can start at 9:00 p.m. at the earliest. Before she leaves for work the next morning, she wants to have enough time to empty the dishes from the dishwasher and put them back into the cupboards. 6:00 o’clock is therefore the latest end time. The wash program itself requires 2 hours.
In the following graphic all information is visualized. The red curve is the estimated electricity price for these points in time. With this information, the wash cycle is set to almost the end of the specified period, since the electricity price is cheapest there.